Interview with Gigglepotamus
 March 29, 2010
Filed under Interviews
Tags: gigglepotamus, handmade, handmade philly, interview, painting, Philly Etsy Team, velveteen rabbit, wood, workshops

1. Would you introduce yourself, your background and how Gigglepotamus came to be.
My name is Lauren Meakim, and I am lucky enough to stay at home with my 3 little boys, Maxfield (6), Wyatt (3½), and Jackson (1). They are really the reason & the inspiration behind Gigglepotamus. I graduated from the Tyler School of Art with a degree in Graphic Design & Illustration. I always saw myself going into children’s book illustration, but I don’t think I was really prepared right out of school to tackle the competitiveness of the freelance world. I still have no idea how one goes about getting a book deal!
Anyway, art always remained in my life in one form or another, but it wasn’t until I was expecting my first son that I started noticing an interest in fabric. One thing led to another, and before I knew it, I was making simple quilts and baby items. That was over six years ago, and its amazing how much I’ve learned and grown in that time. I’ve since returned to my roots and added prints and paintings to the collection of items I sell.
2. I want to ask you about your collection on Etsy but first tell me about your avatar.
avatar
Well, my husband was working on a post for his own blog (http://www.poopandboogies.com) one day. I can’t remember specifics, but he was gluing googly eyes onto his chin with peanut butter & filming himself upside down doing some silly act. Of course, the kids wanted in on it, so we let them have a go & I snapped that picture of my oldest. I guess it depicts how I want Gigglepotamus to be perceived- lighthearted and fun, so I decided to use it as my avatar.
3. And the humble houses on Etsy are adorable. Tell me how they got into your collection and how you create them.

humble house
The houses came about after what seems like years of trying to find a way to merge my art & craft. When we were planning my youngest son’s nursery, I got the idea to hang a set of colorful little houses in a row above his window. I started playing around with some scrap wood and paint, and liked what was happening. The first ones were a bit different than what they’ve evolved into. Now I use more muted colors and although I think they’re just as whimsical, I also think they now reflect more of my personality. I guess I sort of had a breakthrough moment when I started adding text to them, and from there, it was only a matter of time before they took on their own little stories. All of the decoupaged images are reproductions of my paintings. Several layers of paint and sanding are worked over repurposed wood to give them a weathered patina. Finally, some details are finished off with a woodburning tool for added dimension. I’ve always been a fan of small format art, so they seem to be a good fit for me.
4. What other items have you sold on Etsy?
I sell a lot of hats in the fall & winter, so I probably won’t list any for a while, although I do have bunny hats, like the one in this photo, that are available for spring/Easter.

bunny hat
The prints are mixed media: acrylic paint, fabric, and text from storybooks. Both the prints pictured use excerpts from The Velveteen Rabbit, a story which I also use quite often for my houses. 

5. If you could pick one thing you do best, what would that be?
The one thing would be that I have a good eye for color and design. It’s just something that comes naturally to me. I rely a lot on my drawing background, and lately I’ve been incorporating it more with other elements, such as text, fabric, found objects, etc. I like to think my work is different, because it comes from me, plain and simple.
6. Tell me about your workspace.

studio
I am very fortunate to have an extra bedroom in our house which is dedicated to all of my crafty endeavors. The photo shows my sewing desk & cutting table. What it doesn’t show is the horrible mess that doesn’t really ever go away! I like to think of it as organized chaos. Other than that, I have another work table, a LOT of fabric, and an ironing board that stays out. As of late, even though I said I would never do this, I have also taken over my dining room table as an area to produce my paintings and humble houses.
7. How has the popularity of the internet affected your business?
I think at this point, I would be crippled without the internet. I use it for everything from doing my taxes, to connecting with other artists, researching what shows and competitions to do, and finding inspiration. Even though it’s been around for a while, so many of us artists are just starting to scratch the surface of the possibilities for networking, marketing, and exposure. I can’t say that I do a lot of internet sales, but I’m so grateful to have my little blog address so customers that I meet at shows can follow me and see what I’m up to, and where I’ll be next. And of course, the Handmade Philly group has provided tons of valuable feedback, information, and advice to myself and others like me.
8. So, what are your plans for the rest of 2010?
I always joke that I have way more ideas than I do time, but this year I would like to focus even more on my paintings and drawings. I also would like to develop some wholesale accounts and/or more consignment relationships, so that I can spend more time making stuff, and less time out at shows. I love getting out and meeting customers and other artists, but it is incredibly difficult being away from my family on weekends.
You can see more of Lauren’s creations and read her blog at these links
Etsy: www.gigglepotamus.etsy.com
Flickr: http://www.flickr.com/photos/gigglepotamus/
Facebook: www.facebook.com/pages/Gigglepotamus/173094083894
WordPress: http://www.gigglepotamus.wordpress.com
This is third in a continuing series of interviews, let me know what you think.
Jan Cohen, http://www.thejmccollection.com
Sugarloaf Craft Festival
March 26, 2010
Filed under Local Events
Tags: craft shows, Events, gigglepotamus, sugarloaf
This weekend I attended the Sugarloaf Craft Festival in Oaks, Pa. This show was a treat for the eyes- not only was the talent unquestionable, but so many of the booth displays were almost as inspiring as the artwork.

The three-day show featured over 300 juried artisans, gourmet food vendors, interactive demonstrations, live music and even children’s entertainment. Maybe it was the fact that it fell on a weekend of fabulous weather, but attendance did seem a bit light, at least on Sunday, the day I was there.
In addition to shows in VA, CT, MD, and NJ, the Sugarloaf also comes to the Philadelphia area twice a year, once in the spring, and again in the fall. If you are considering doing a Sugarloaf show, booth fees start at $595, and jurying for fall 2010 began in January.

Elkins Park, PA artist Kristen Stein & daughter of Studio Artworks

Blue Bell papercutting artist Jupi T. Das

Crafty Baby- A fun & colorful booth
Posted by Lauren Meakim of Gigglepotamus
Tuesday Tutorial ~ Natural Egg Dying
March 23, 2010
Filed under DO IT YOURSELF
Tags: DIY, easter, gigglepotamus, Philly Etsy Team, seasonal craft, spring, tutorial

It’s official- spring has sprung, and egg dying season is upon us. Growing up, we always purchased food coloring kits, but if you’d like to try something a little more traditional, then please read on. Natural dyes do take a little longer than their chemical counterparts, but I think the results are worth it.
I like the idea that dying eggs can be safe for the environment, both by using natural elements as well as less packaging, while also paying homage to how I imagine our ancestors must have done it. For this tutorial, I have also included a stencil technique if you’d like to add an additional layer of interest to your eggs.
Let’s start with the beets, which will turn your eggs anywhere from pale pink to deep red-violet, depending on how long you leave them in the dye bath. I boiled two cups of chopped beets with two cups of water, 1-2 tablespoons of white vinegar, and 1 T of salt . I am told the eggs come out better when the dye mixture is hot, and since you have to hard boil them anyway, you can just put them all into the pot together & boil for 15 minutes. After that, remove from heat, and leave the eggs in the mixture until desired shade is achieved. I left mine in for several hours, and this is what I got:

Since the natural dyes leave the eggs somewhat dull, you can polish them when they’re dry with a little bit of oil. As you can see from the photo, the oil polish (I used canola) also deepens the color quite a bit. For the egg on the left, I tried tying rubber bands around it to give it more texture. For the one on the right, I used wild strawberry leaves as a stencil.
To achieve the stencilling effect, gather whatever materials you think would make an interesting pattern on your egg. I went out in my backyard and gathered the following:

Next, you will need some old nylon stockings. Cut off the feet so you have a little bag big enough for the egg with room to tie it off. Place the egg inside, with whatever material you are using for a stencil. I tried to flatten the leaves out against the egg surface as best as possible, but it is a little tricky, and I liked the randomness of it anyway. Then, tie off the open end of your stockings as tightly as possible with either a rubber band or a knot, and you should have something that looks like this:

From there, you just put it in your dye bath until you’re ready to remove it. Here are how some of my other eggs turned out:

Boil one head of chopped cabbage for about 30 minutes. Strain the liquid, and add ¼ cup white vinegar and ¼ cup of salt and your eggs so they are covered. Not only will the eggs turn a beautiful shade of blue, but you can see the difference between leaving them in the dye bath for several hours vs. about an hour (bottom eggs).

For the turmeric eggs, I boiled one cup of water with 1 T. turmeric, 1 T. white vinegar, and 1 T. salt. I transferred the mixture to dye cups & immersed my eggs for only about an hour.

2 cups yellow onion skins boiled with 2 cups water, 1T. vinegar, & 1 T. salt. I wrapped the one on the right in onion skins with nylon over top, and it came out with a really cool marbled texture.
I haven’t personally tried these, but here are some other natural elements that you can experiment with. Just remember to add the vinegar so the dye sticks to the eggs:
Blue:
Tutorial Tuesday: Marble Magnets
February 23, 2010
Filed under DO IT YOURSELF
Tags: Craft, DIY, gifts, gigglepotamus, handmade, handmade philly, magnets, marble, Philly, Philly Etsy Team, tutorial
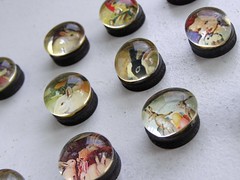 These magnets are super easy and very satisfying to make- you can cover a lot of ground in a very short amount of time. For this reason, I’ve always thought they’d make great wedding or shower favors, “save the date” reminders, or teacher gifts.
Here is what you’ll need:

- Package of clear, flat, glass marbles, approx. ½″- ¾″ (found in the floral dept. at craft stores).
- Silicon sealer/adhesive – I got mine at Walmart in the adhesive section near the paint aisle, but you should be able to get this at the craft store as well. Don’t forget to read that warning label!
- ½″- ¾″ magnet rounds (strong) found in the craft store- usually sold in packs of 50.
- Various small pictures cut from magazines, personal photos, clip art, etc.
- Scissors or a ½” hole punch (not pictured).
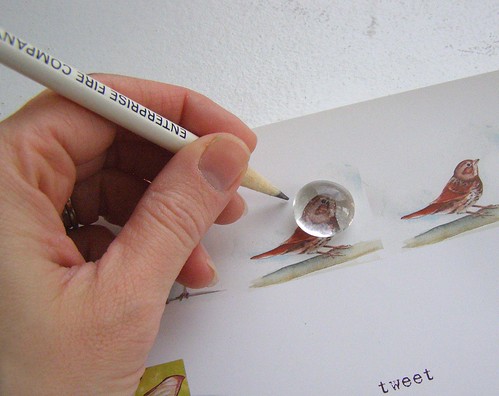
First, decide what pictures you are going to use. For this example, I resized one of my paintings, then printed it onto photo paper, which works really well. Test out how it will look by placing one of your marbles over top. As you can see from the photo, some magnification does occur, so you‘ll probably need a smaller image than you think. Once you’ve got it in a good spot, trace lightly in pencil around the marble:
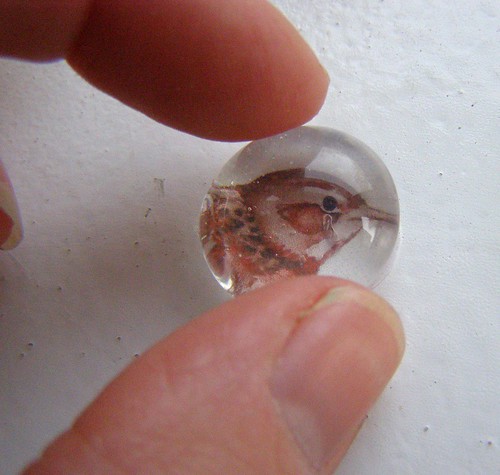
Cut along your line using either the scissors or hole punch, and apply a small bead of silicon to the right side of your picture:

Now take your marble and squish it down over top of your image, pressing out any bubbles in the silicon. Just wipe off any excess with a cloth. I never had any problems working with this stuff, but if you’re sensitive, you may want to open a window and/or wear gloves.
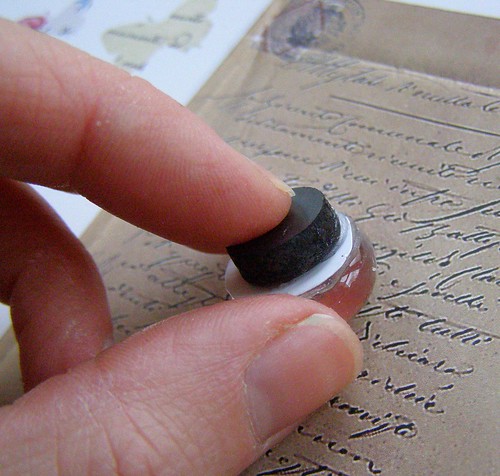
Once the silicon is dry, just use it in the same fashion to attach the magnets to the backs of the marbles:
Done! I literally burned through about 50 magnets in less than an hour- and that was while trying to supervise my 3-year-old son who wanted to help. If you are sans a small assistant, my guess is you can probably make ’em even faster.

Lauren Rambow-Meakim is the full-time mom of 3 small boys and founder of Gigglepotamus, which specializes in whimsical clothing, accessories, and decor for babies, children, and beyond.
